Showing posts with label Gift Card Holder. Show all posts

Thursday, November 11, 2021

OSAT Season of Cheer Blog Hop

Happy Thursday to you all! This week has sure blown by! Taryn leaves for a church youth retreat tomorrow morning and Wesley leaves for the football teams away game tomorrow. They are giving the boys a brunch before sending them on their way, so I have to whip up 2 dozen muffins! Wesley has requested these pumpkin muffins that were one of the first recipes I tried from Pinterest. They are just a box of yellow cake mix and a can of pumpkin. Sometimes I spruce them up with a bit of pumpkin pie spice. All three kids really enjoy them.
Today I am back with my friends and crew from the One Stamp At A Time Blog Hop! We are hopping with the theme "Season Of Cheer", so if your holiday spirit is lacking, this hop is sure to get you feeling jolly again! I decided to pair up the Encircled in Warmth with the Heart Warming Hugs DSP for a fun home décor project and a simple little gift card holder, Lets take a look!


I just love how these projects turned out! I dwelled on the card for hours. The juices weren't flowing and I was pressed for time. I still, no matter what I try, am a master procrastinator! How do I fix this!? My wooden spool Christmas Tree is amazing and maybe why the juices weren't ever flowing! I used 11 spools. A painted one in brown for the trunk and the rest wrapped in assorted patterns from the Heart Warming Hugs DSP. It is accented with a bow of the Real Red Ruffled Ribbon and a stitched star of the Gold Metallic Specialty Paper.


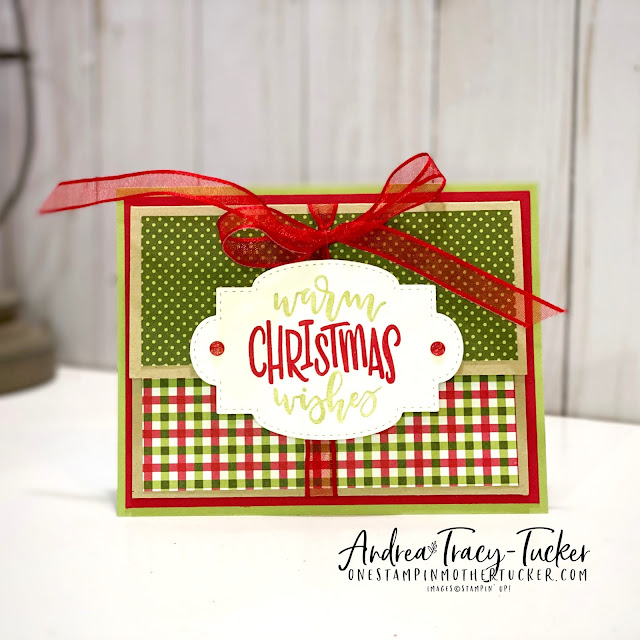
This gift card holder started with the sentiment made with the Encircled in Warmth stamp set and my Stampin' Write Markers in Pear Pizzazz and Real Red. It is die cut with the largest label in the Stitched So Sweetly Dies. This fun little gift card holder sits on a piece of Pear Pizzazz that is 4 1/4" x 5 1/2". This was then matted with Real Red and the pocket feature made of Crumb Cake. I added a bit of the Heart Warming Hugs DSP and the Real Red Sheer Ribbon to keep it closed. You can see the inside below.


The sentiment is attached to the top flap with a few dimensionals. I then accented the label with some Wonderful Gems.  This is the perfect kind of Gift Card Holder for mailing this holiday season!

I am so glad that you stopped in today to see what I made for this Season of Cheer blog hop! I can't wait for you to see what my friends have made! You can click through the blog roll below for all of your holiday inspiration!


Thursday, October 4, 2018

Joyous Deer Gift Card Holder Tutorial

Happy Thursday to all of you! The creeping crud has hit the house and the boys are home for a second day. The weather has definitely turned to fall in a matter of 24 hours... Yesterday was 90 degrees and today is not suppose to get about 55 degrees or so! I think that days of shorts and flip flops or sandals are now a recent memory. Time to whip up some comfort food!

Yesterday I was live on my Facebook page with this fun tutorial! I made a bit a of a different one for my viewers, I still like this one best! I really can't get enough of the Dashing Deer Bundle with the Joyous Noel DSP. The rich earth tones of this paper combined with the Copper Foil accents is just stunning. 

Enough of the chit chat... Let me get you the tutorial!


Here is the basics...

  • Cut DSP to 6 7/8" x 6 7/8" for Envelope Punch Board (If you look at the chart on the Envelope Punch Board this is the size for a 4" x 4" Card).
  • Create Envelope with above DSP, set aside
  • Cut 4" x 4" of a coordinating Card Stock
  • Cut 3 7/8" x 3 7/8" layer (this is the layer that you would stamp a sentiment on if you would like), adhere to above layer with Liquid Multipurpose Glue
  • Cut 2 1/4" x 3 7/8" DSP (I used the same DSP but the opposite of what is on the inside, but you can you do a coordinating paper in the same pack)
  • Use your 1" Circle Punch to make a bit of a notch in the center, put Tear & Tape along bottom and both sides to adhere the DSP to the base. This will make your cute little pocket for the Gift Card to slip into.
  • Adhere the whole card base to the INSIDE of your Envelope.
  • The belly band is the closure for this card, I have used 1 1/2" x 10" strip of coordinating DSP with some Tear & Tape at the end. 
That is the bare bones, You can embellish, stamp and make this as fancy as you would like. I can't wait to whip up a bunch of these to have at my vendor fairs! If you make one email me a picture! I can't wait to see them all! I have provided a full product list below for you to shop with! Remember that is purchase $50 or more, I have 14 amazing EXCLUSIVE tutorials for you to enjoy! 
Happy Ordering!


Product List

Tuesday, December 12, 2017

Stamp Ink Paper Red Green Gold Challenge

Happy Tuesday! I am back in full swing with Stamp Ink Paper today with a really traditional color challenge that will go with your Ho Ho Ho Spirit! The kids have about an week and half of school until Christmas Break. We enjoyed some fun festivities over the weekend to get us in the mood. While I had a small card class at Lala's Bakery, the kids enjoyed Paint Your Own Pottery, and Taryn went to go see Santa! After the class was over we ran home to get our favorite Christmas jammies on to decorate Gingerbread Houses at a friends. If that doesn't get you in the holiday spirit I am not sure what will. 

Let me show you our challenge!


This was designed for my class this past Saturday, I had two made because even Taryn made cards this weekend and this was the one I helped her with (notice the bottom of the stitched oval?). She keeps telling me that she is going to be Artisan and I just need to move out of the way when I am working in the craft room. The girl has big dreams for a 7 year old daughter of a Stampin' Up! Demonstrator! Let me get you the details of my card...


So, it is no secret I love to make these treat bags into these amazing gift card holders. If you score 3" from the bottom fold them up and add a little Tear N Tape to each side the possibilities are endless! I have used 2" x 12" strip of Be Merry DSP to make the nice little belly band around the Gold Striped Treat bag. I made about four loops of Linen Thread for the nice loopy bow. The Metallic Snowflake Doily was the perfect touch under my ovals. The stitched oval was stamped using Cherry Cobbler ink and the sentiment is from the Oh What Fun stamp set. It is nicely layered onto a Garden Green Layering Oval. The Gold Glimmer Paper Circle Tab Punch was perfect for the card insert. The Whisper White is nicely matted onto Cherry Cobbler card stock. The sentiment is stamped in Garden Green. 

Thank You so much for stopping by today! I can't wait to see what you whip up with this weeks challenge.

If you like what you see and want to whip some up on your own I have provided and full product list to help you shop!


Product List

Sunday, October 1, 2017

Creation Station Tricks of The Trade Blog Hop

I am back this Sunday with the Creation Station Team. WOW!!! Where did last month go??? Before we know it were are going to hustling and bustling to get that last minute Christmas present. It seems as though as soon as summer break is over the year just speeds right past us.


Did you get to by way of Jennifer? She always has something amazing waiting for us! If you didn't you can always click the back button below.


This month we are hopping with "Tricks of the Trade" and although my trick may not be all that fancy, it makes for a really pretty and easy Gift Card Holder! What I have done below is scored the bag at 3" from the bottom. I then put Tear N Tape on either side and fold this up towards the top of the bag to make a cute little pocket that will hold a gift card! Now lets get to my creation!


I really just can't get enough of this Year of Cheer Specialty DSP! The foils are amazing and so versatile. I have made a nice band using two of the papers from this pack and tied a quick bow with coordinating ribbon. My sentiment is from the set Add A Little Glitz and in the Smoky Slate ink. It really was just the right touch. I added a few of the stickers from the Eastern Elegance suite to add a little sparkle! You will notice I added a little Blushing Bride piece of cardstock so that you could see where you could put it.

This idea is so simple and elegant! I used mine for teachers last year!

Thank You so much for stopping by! Next on the hop is the fabulous Julie Beltramo! She is going knock your socks off!

Julie Beltramo