Showing posts with label Large Letter Framelits. Show all posts

Thursday, May 3, 2018

A Paper Pumpkin Thing You are My Anchor Blog Hop

Happy Thursday and welcome to the April edition (even though its May) of the A Paper Pumpkin Thing Blog Hop! A few of our team had a conflict on our regular Thursday so we decided to help them out by moving the hop to today! 


I am so excited because this kit had so much in it! So the possibilities were endless. I was so excited to have been asked by Paper Pumpkin to provide a couple alternatives for this kit on the
Paper Pumpkin page. So unfortunately while possibilities may have been endless, my time is not lately and I wanted to show you what I made for Paper Pumpkin and I created a fun card for you to take a peak at... Let's get to the designs!


My AHOY accordion banner was designed for the Paper Pumpkin blog! Don't worry I asked permission before using it today! I used two of the striped note cards from the kit to create the accordion. To do this I actually used Liquid Multipurpose Glue. Once this was done, I actually used my big bite Crop A Dile to punch the holes at the top. Then I ran the Crumb Cake colored twine and ran it though the holes tying it off at both ends with the Calypso Coral die cut Anchors. To create the AHOY portion of this, I have used one of the Circles from the Stitched Shapes Framelits with a few of the patterns of the patterns provided in the kits then added the Large Letter Framelits in Crumb Cake to each circle. I even stamped the sea gulls and added a few hearts to embellish.

I wanted to be sure that my card coordinated with my banner. I again have used the stripe and adhered it to a matte of Calypso Coral. Again, I have repurposed a note card from the kit. This time I used the gold foil accented white circle die cut from the kit because the stamps are Photopolymer I was able to bend the sentiment and stamp it in Island Indigo. A 1 3/4" Circle of the Anchor Pattern and added with Stampin' Dimensionals and then added the Calypso Coral Anchor and Crumb Cake Twine! 

So happy to share my creations with you today! Make sure you scroll down for a full list of our hop participants! You will want to be sure that you tour the whole hop!


Friday, July 7, 2017

2017 Salt Lake City OnStage Live Display Stamper Submission

I am so excited to be submitting the creations below to be considered for Display Stamper at November 2017 OnStage Live in Salt Lake City! Some of them may not look so new to you but they are some of my recent favorites along with a fun new scrapbook layout!

I attended my first OnStage this past April in San Diego! It is an amazing experience and I can't wait to go again!


Thursday, October 27, 2016

Halloween Teacher Gift

I know a Thursday non blog hop post! Who Knew?! But when I came up with this great little decor piece I just wanted to share it with EVERYONE!!!
I was trying to come up with something I hadn't made for any other teacher! I tend to be more creative when I like the teacher... funny how that works! 

I started with the idea that frame is for a 5 x 7 picture. The stamped layer is 4 1/2 x 6 1/2 inch piece of Whisper White cardstock. I started by stamping using the Timeless Textures set at the bottom with  Smoky Slate ink. Once I got the look I was trying to achieve I added the Basic Black spider webs from Ghoulish Grunge. The Perfect Plum drips from the top also came from the Ghoulish Grunge stamp set! When my stamped layer was complete I added a fussy cut house from the Halloween Night DSP to the bottom right and a quick strip of the coordinating washi at the top left. My "Boo!" sentiment was created using the Large Letter Framelits with black glitter paper I found in my stash. This project wasn't quite complete without a little Heidi Swapp Tinsel Color Shine and some Pretty Pink Posh sequins!

I can't wait to see what the teachers think of this great little decor piece!
Thank You so much for stopping by!

Wednesday, September 7, 2016

ICS Blog Hop Technique Time


It is the first Wednesday of the month! We all know what that means. It is time for me to Inspire, Create and Share some fabulous creations using Stampin' Up! products with a bunch of my Stampin' Up! friends!
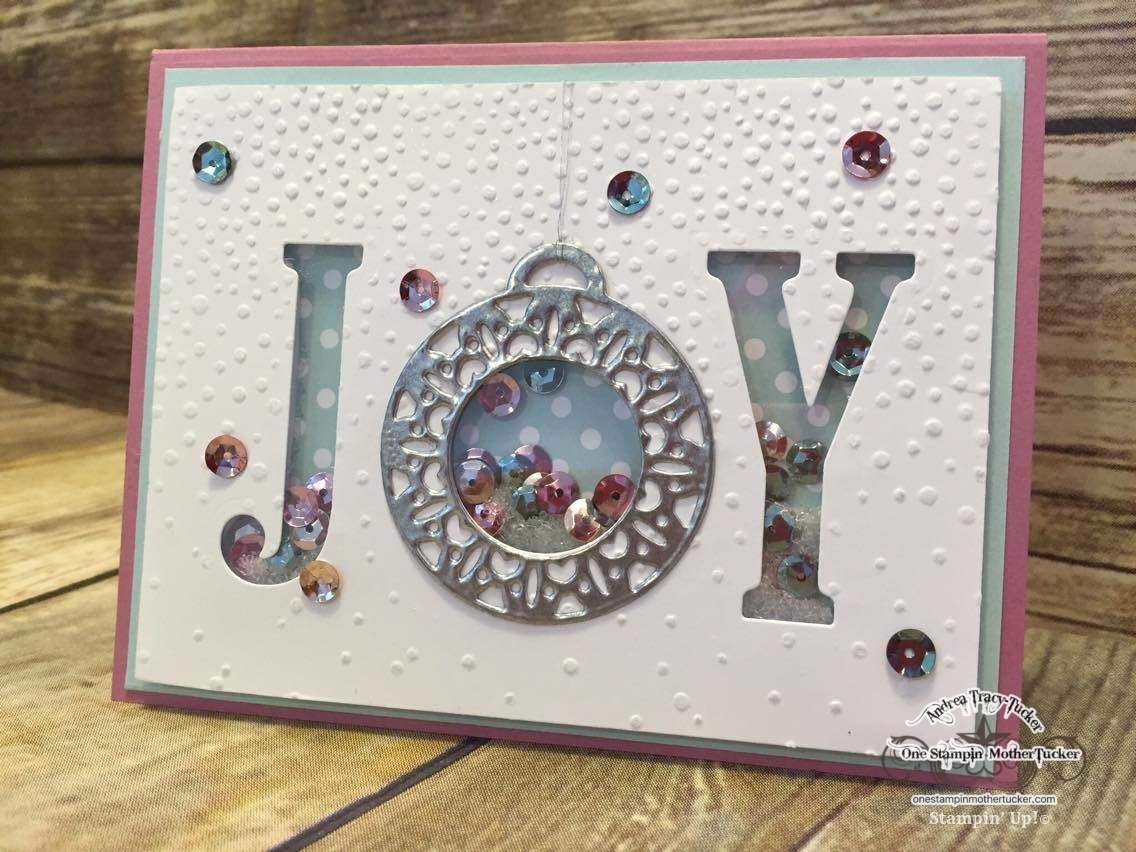
This month we have a Technique Hop and I am showcasing the Shaker Card technique! We all know I love my shaker cards! If you follow my blog this is my second post today... It is also my second shaker card! What does that tell you?
Justin Krieger is responsible for the shaker card monster I am today.. it is true!! He took the time to show me how to create a shaker via one of our FaceTime chats. When I make a shaker I try to make it the feature of my card. The Merriest Wishes bundle is PERFECT for a shaker. I had seen a card with a similar idea but I knew I wanted to take it to a WHOLE other planet! 


This idea has been festering in my head ALL WEEKEND LONG... and it was a long weekend. First thing is first, I actually die cut the Softly Falling embossed Whisper White panel. The letters J and Y are from the Large Letters Framelits. I set them on the Magnetic Platform with the die from the Merry Tag Framelits set. I got them set just right by using a ruler to make sure that they were level. Once running them through the Big Shot I got down to business. Here is a common mistake when adhering your Window Sheets, don't use glue!! Glue hardens and once it hardens your window panel can separate. We don't want that! I like to use Tear & Tape. I simply run it along the openings/windows of my shaker. This can be tedious!! I then use my bone folder to make sure my Window Sheet is good and stuck! On this card I wasn't quite sure how I wanted to do the shaker bits. Each window had its own shaker area... so in other words there are 3 different shaker elements on this card. Foam Adhesive Strips.... YOU NEED THESE! They are better than foam mounting tape!! They are skinny strips with just the right thickness of foam to give you room to shake away! I usually try to get as close to the edge of all of windows! The Foam Adhesive strips are 2 sided much like a Stampin' Dimensional, so once I had my 3 shaker "wells" done, I started adding my Fancy Frost sequins! I also had some snow like stuff to mix in as well. This sequin mix is where my colors came from! Soft Sky and Sweet Sugar Plum make such a fun color combo for Christmas! I like to use something simple for the background of my shaker! The polka dot pattern from the Subtle DSP stack was spot on so I adhered it to the Foam Adhesive strips. Now that the shaker element was finished I just needed to get my Merry Tag adhered to the front! Isn't that ornament the cutest? I actually heat embossed silver twice to make it look like metal! The card front was adhered to the Soft Sky matte using the foam adhesive strips and then adhered to the Sweet Sugar Plum card base. I added a few sequins and a strand of the metallic thread to finish my card off! PHEW!!!! Are you tired or inspired?? If you have questions feel free to email me or hunt me down on Facebook!

Now for Megan Thompson! She has a spooky technique to show you!

Megan Thompson